The Script Manager is a very powerful tool and lets you easily disable front-end scripts on a per post/page or site-wide basis. However, there is a lot more going on with plugins than just their front-end scripts. That is where MU mode comes into play.
Must-use (MU) mode takes the Script Manager to a whole new level. It gives you more control and the ability to disable WordPress plugin queries and hooks as well as inline CSS and JS. Now you can control every aspect of a plugin, from its front-end scripts, inline code, and MySQL queries wherever you want.
Another benefit of MU mode is that you might be able to see additional plugins that you didn’t before. The reason is that for the Script Manager to detect scripts, they have to be enqueued in WordPress. Unfortunately, not every developer enqueues their scripts.
If you disable a plugin in MU mode, it will disable everything (scripts, queries, inline CSS/JS, etc.), regardless of whether a script is enqueued correctly or not.
MU mode requires elevated permissions and a file to be copied into the mu-plugins directory.
How to enable MU mode
Warning: Any previous plugin-level disables will now disable the entire plugin. Please review your existing Script Manager settings before enabling this option.
We recommend configuring this on a staging or development site before running on your production site. You can also use Testing Mode.
Follow the steps below to enable MU mode.
Step 1
First you will want to make sure you have the Script Manager enabled.
Step 2
Open the Script Manager. To do this, you can browse to a page or post on your site (it won’t appear in the main WordPress admin dashboard or from the plugin settings page). We recommend browsing to your homepage and starting there.
Step 3
Click “Settings” on the left-hand side and then toggle on the “Enable MU Mode” option. This will copy a file into the mu-plugins directory.
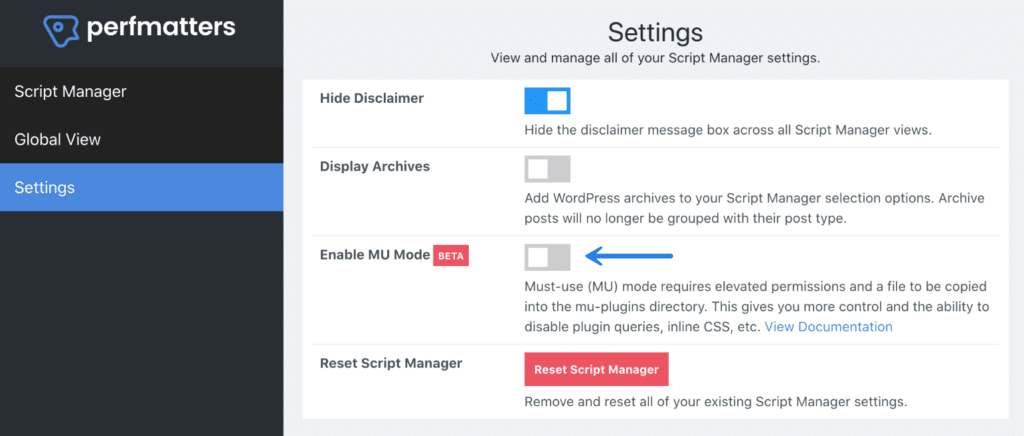
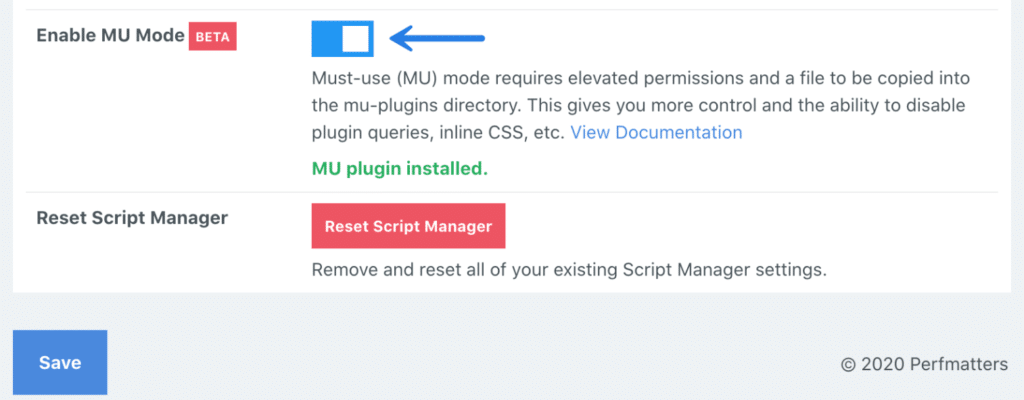
If copying the file was successful, you will see the following confirmation message: “MU plugin installed.” If you see an error message, see the troubleshooting steps below.

Using MU mode with the Script Manager
If you want to use MU mode, it’s good to familiarize your self first with how the Script Manager works. Below we are going to show you two different examples of how to use MU mode.
How to disable a query from a plugin
In this first example, we are going to use a free WP Google Maps plugin. We install and activate the plugin. But we only want to use a Google Map on our contact us page. This means it shouldn’t be loading things anywhere else.
Here is a screenshot of the homepage of our site, with Query Monitor, before activating the plugin. You can see the following:
- Page generation time:
0.0384 - Database query time:
.0015 - Total number of queries:
44.

And here is a screenshot after activating the Google Maps plugin, on the homepage of the site. Remember, this is not where we want to use Google Maps. You can see the page generation time, database query time, and number of queries all increased.
- Page generation time:
0.0605 - Database query time:
.0023 - Total number of queries:
48.

If we dig deeper we can see that the plugin is running queries on every page load. This will increase page generation time, especially on uncached visits. Not only that but additional hooks are firing as well.

We want to effectively disable the WordPress plugin where it shouldn’t be running. With MU mode enabled in the Script Manager, we can browse to our Contact page. We open the Script Manager and under the Google Maps plugin, select the group toggle to disable it. You will see a little “MU Mode” indicator.
We select disable everywhere and then for an exception use “Current URL,” as we still want to use a Google Map on the Contact page.
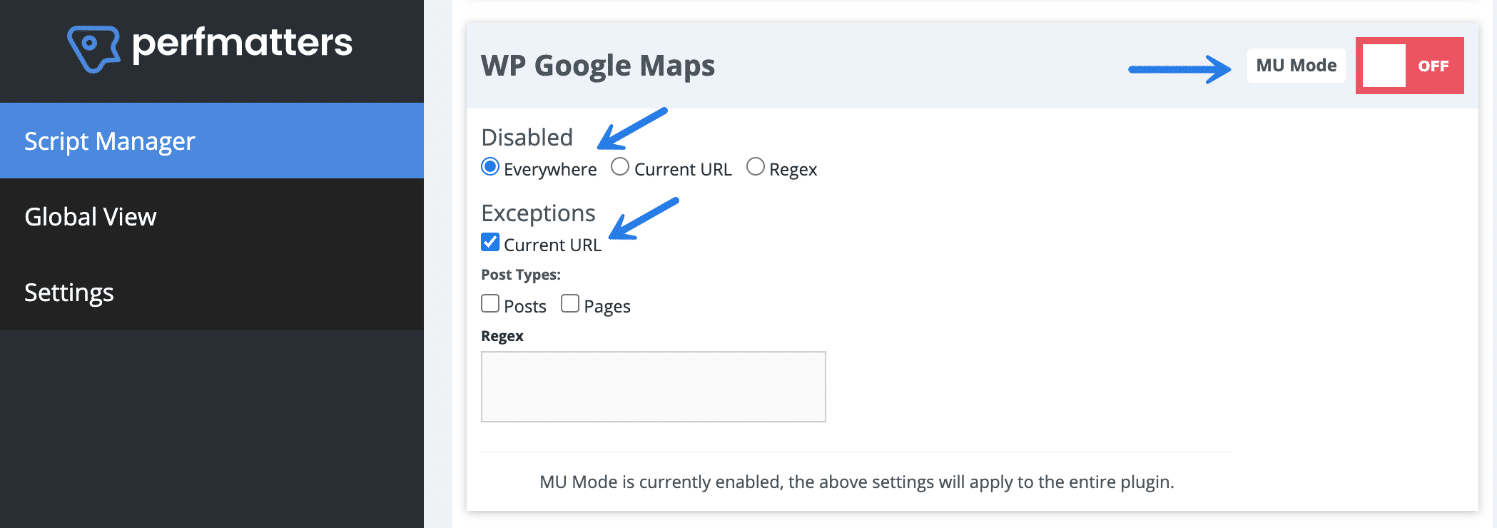
We scroll down and click “Save Changes.” Note: When you disable a plugin in MU mode, nothing from it is loaded, including front-end scripts, queries, hooks, inline CSS/JS, etc.
Here is the homepage after we have disabled the Google Maps plugin from loading. You can see it decreased the page generation time, database query time, and the number of queries is back to what it was before activating the plugin.
- Page generation time:
0.0387 - Database query time:
.0015 - Total number of queries:
44.

How to disable inline code (CSS/JS) from a plugin
In this second example, we are using a free social sharing WordPress plugin. We install and activate the plugin. But we only want to use the social sharing buttons on our blog posts. This means it shouldn’t be loading any code on our homepage or any other pages.
However, after activating the plugin it immediately adds 181 lines of code across the entire site, including inline CSS and inline JS.
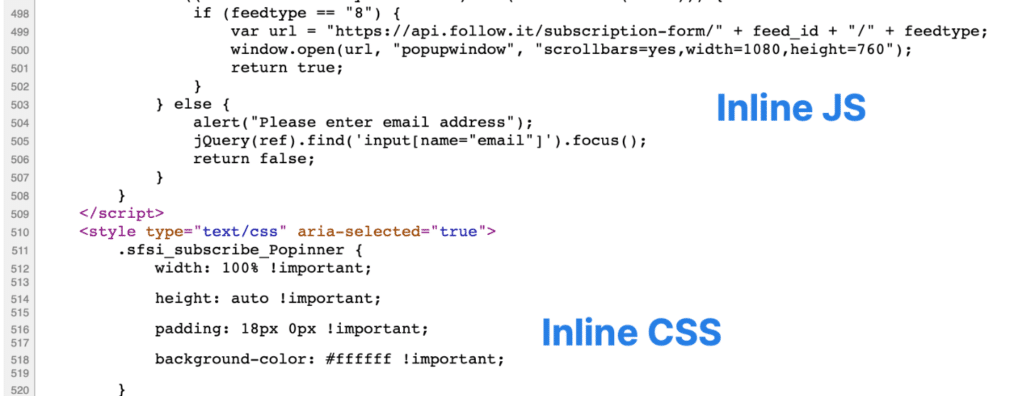
We can easily disable the plugin from loading the inline CSS and JS. With MU mode enabled in the Script Manager, we browse to a page on our site. We open the Script Manager and under the social sharing plugin, select the group toggle to turn it off. You will see a little “MU Mode” indicator.
We select disable everywhere and then for an exception use “Posts,” as we still want to use the social sharing plugin on our blog posts.
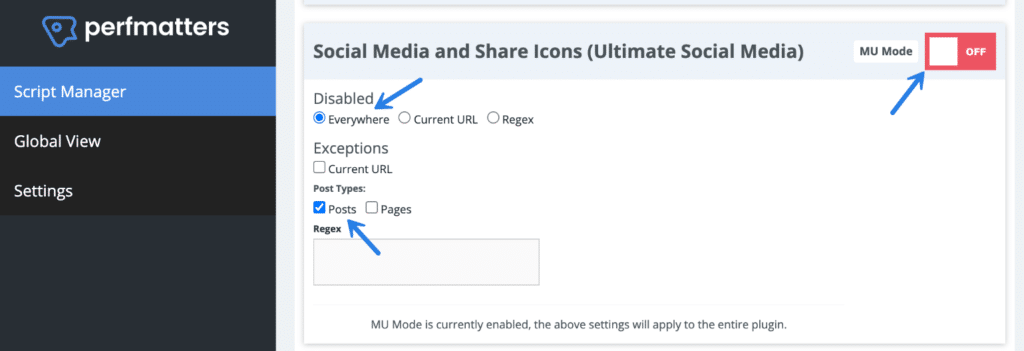
We scroll down and click “Save Changes.” Note: When you disable a plugin in MU mode, nothing from it is loaded, including front-end scripts, queries, hooks, inline CSS/JS, etc.
And we’re done! The inline CSS and JS is no longer loading on our homepage or any pages, except for our blog posts. We just removed 181 lines of unused code with a few simple clicks.
Make sure to also check out our own social sharing plugin, Novashare. We developed it from the ground up with performance in mind.
Troubleshooting MU mode
Below are troubleshooting steps if you encounter problems with MU mode.
MU debug mode
MU mode is very powerful, and with that comes a possibility of it breaking something. Because of this, we have MU debug mode. If, for any reason disabling a plugin breaks something, debug mode lets you always have a way to access the Script Manager. You can then test re-enabling a plugin or temporarily turning MU mode back off.
You can access debug mode by appending ?perfmatters&mu_mode=off to the end of your URL. This will force the page to load with MU settings disabled.
https://yourdomain.com/?perfmatters&mu_mode=off
MU plugin file not found
MU mode requires elevated permissions and a file to be copied into the mu-plugins directory. Some servers may have special permissions configured which prevents the perfmatters_mu.php file from being copied over correctly. If that is the case, you will most likely see the following warning:
Perfmatters Warning: MU plugin file not found.
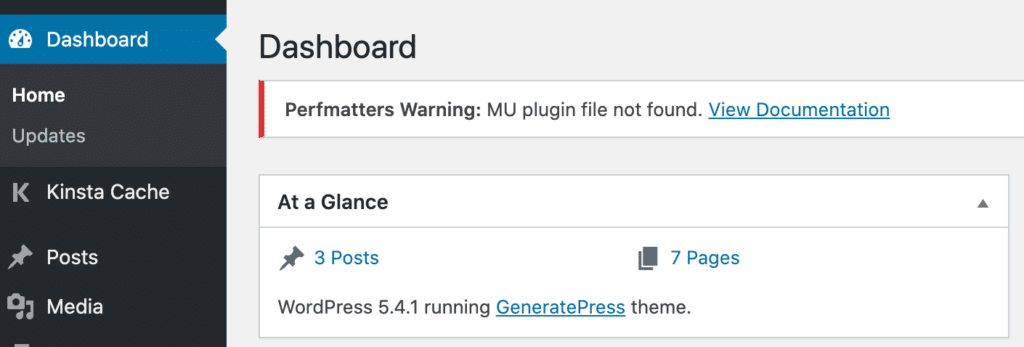
If that is the case, it could be one of two things. The first is that it might be your web browser’s local cache. Therefore, go and toggle MU mode back off and click “Save.”
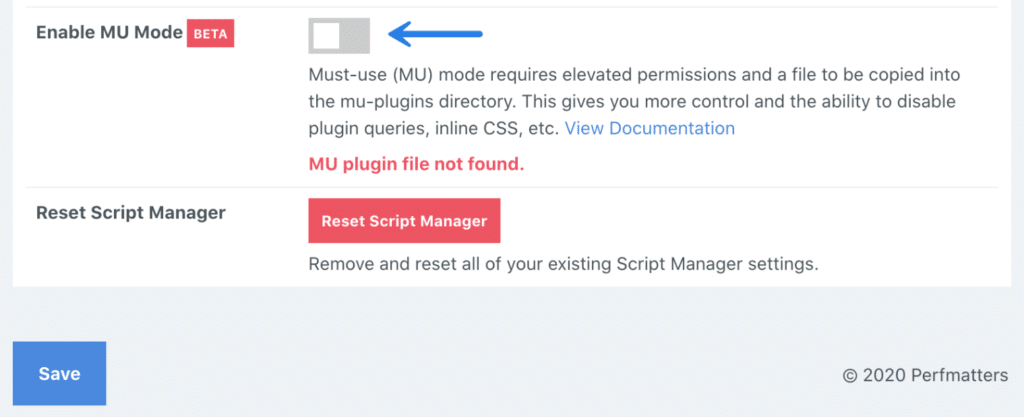
Hard refresh the entire page in your browser. Then toggle MU mode back on and click “Save.” This will attempt to install the MU plugin again. Hard refresh the entire page in your browser. If you see the green “MU plugin installed” message, then you’re good to go.
If you are still having problems, you can always copy the file over manually via SFTP. Just follow the steps below.
Step 1
First, download the latest version of the Perfmatters plugin (.zip) from your account.
Step 2
Unzip the plugin and find the perfmatters_mu.php file. This is located in the /inc/ folder.
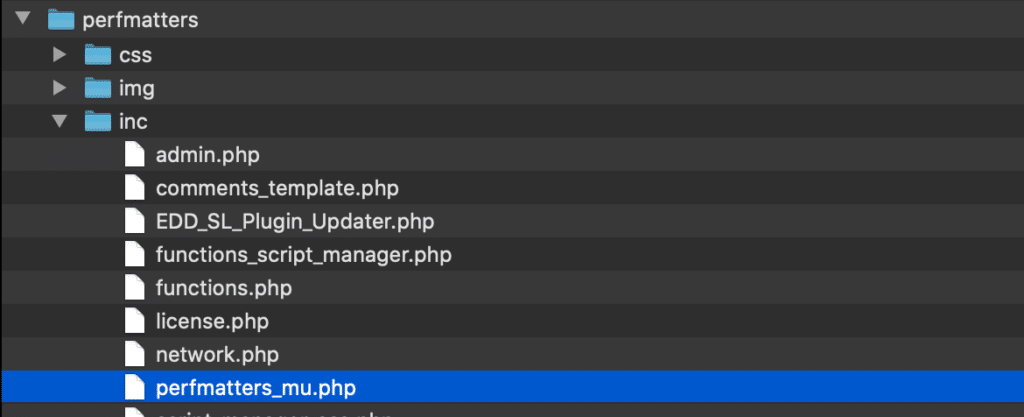
Step 3
Connect to your site via SFTP.
Step 4
Copy the perfmatters_mu.php file from your computer to the following directory.
/public/wp-content/mu-plugins/

Note: Your public folder location might vary based on the configuration of your hosting provider.
MU plugin version mismatch
MU mode requires elevated permissions and a file to be copied into the mu-plugins directory. Some servers may have special permissions configured which prevents the perfmatters_mu.php file from being updated correctly. If that is the case, you might get an error about a version mismatch:
Perfmatters Warning: MU plugin version mismatch.
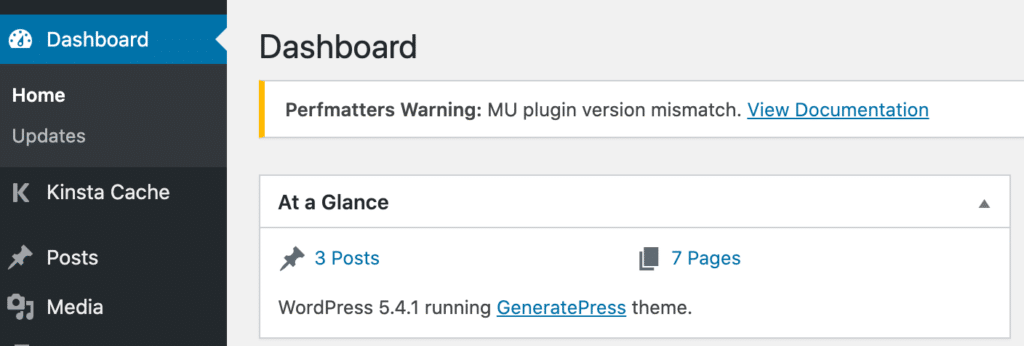
If that is the case, the first thing you can do is try reinstalling the MU plugin from the Script Manager settings. Therefore, go and toggle MU mode back off and click “Save.”
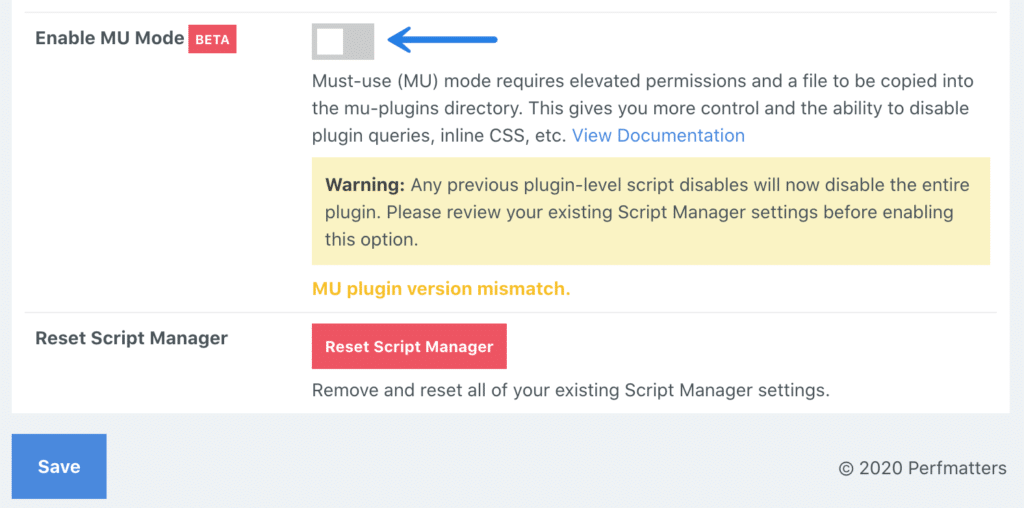
Hard refresh the entire page in your browser. Then toggle MU mode back on and click “Save.” This will attempt to install the MU plugin again. If you see the green “MU plugin installed” message, then you’re good to go.

If you are still having problems, you can always copy the file over manually via SFTP. Just follow the steps below.
Step 1
First, download the latest version of the Perfmatters plugin (.zip) from your account.
Step 2
Unzip the plugin and find the perfmatters_mu.php file. This is located in the /inc/ folder.

Step 3
Connect to your site via SFTP.
Step 4
Copy the perfmatters_mu.php file from your computer to the following directory. Overwrite or delete the out of date perfmatters_mu.php file and replace it with the new one.
/public/wp-content/mu-plugins/

Note: Your public folder location might vary based on the configuration of your hosting provider.
Contact us
Just like with the regular Script Manager, nothing is ever permanently changed. If you are having trouble with MU mode, you can always toggle it back off and contact us. We are happy to help.